donderdag 1 september 2011

Linking an entity between web domain services in RIA services


I’m not the biggest fan of RIA services, but I was pretty surprised the other day when I saw how easily RIA handled the sharing and linking of entities trough different domain services.
So suppose we have the following table structure in our database:


As you can see we have 2 tables: Person and Function.  Then we can generate our web domain services by adding an edmx and then adding a domain service class to the solution.


So I told you nothing new at this moment.  
Now imagine evil reincarnated into a person.  We’ll call this person the customer. One day he comes to you and says: “We’ll need to split the Person table to a centralized database for reuse”.  As soon as you realize he is serious your face will probably be going this way:

But have no fear (RIA is here) because it’s actually pretty easy to accomplish this in RIA services!

At first you’ll need to create a new edmx.  The reason why is because the edmx is basically wrapped around one connection string so for each separate connection you’ll need to create a new edmx.

So the 2 databases will look like this:


And the edmx’s will look like this:


Then build the solution.  Before you can build it you’ll have to remove the person operations from the first domain context.  The reason why you have to do this is because your first domain context inherits from LinqToEntitiesDomainService<FirstDatabaseEntities>. The underlying ObjectContext won’t have any reference any more to the Person entityset that you’ve just deleted.

If you have navigation properties defined in the metadata file then you should delete these also to be able to build.

If you are receiving build errors in your Silverlight projects (which will be very likely), then just ignore these.  It is only essential that you’re able to build the web projects.

Then add a new RIA web domain service class generated from the second database and select the tables you want.  


So now you’ll need to tell RIA services that the Function class in the first entity model is linked to the Person class in the second entity model.  To do this you’ll have to create a partial class of the Function entity.  Now add a property there that will return the Person.  The property must be decorated like so:

public partial class Function
{
    [ExternalReference]
    [Association("Person_Function", "PersonId", "ID")]
    public Person Person { get; set; }
          
}

The External reference attribute will tell the current domain service that the entity this property is returning is from an external domain context.  

The Association attribute will tell the domain service how to link the entities together.  What this will actually do is generate code on the client side that will filter the appropriate entity out.

When you’re finished doing this, build the solution to trigger the code generation client side.  Then you can open the generated file and see that it generated the following code:

public global::DomainService.Web.Person Person
{
    get
    {
        if ((this._person == null))
        {
            this._person = new EntityRef<global::DomainService.Web.Person>(this, "Person", this.FilterPerson);
        }
        return this._person.Entity;
    }
}

private bool FilterPerson(global::DomainService.Web.Person entity)
{
    return (entity.ID == this.PersonId);
}

Notice the generation of the filter depending on the parameters we gave to the Association attribute.

If you’re not interested in coupling the entities server side, then you can always manually couple the entities on the client side with a partial class that has the same code as the generated file.  Either way the client side code will be practically the same.

Now we still need to tell our context object where to find the associated Person entity.  We can do this by calling the AddReference method and supply the Person type and the corresponding context in which the Person entity resides.

_context1 = new DomainService1();
_context2 = new DomainService2();

_context1.AddReference(typeof(Person),_context2);

When this is done you just need to retrieve the data from the server and tadaaaa:

var personQuery = _context2.GetPersonQuery();
_context2.Load(personQuery, PersonLoadCompleted, true);

…

void PersonLoadCompleted(LoadOperation<Person> loadOperation)
{
    var nrOfEntitiesReturned = loadOperation.AllEntities.Count();
    MessageBox.Show(nrOfEntitiesReturned.ToString());

    var functionQuery = _context1.GetFunctionQuery();
    _context1.Load(functionQuery, FunctionLoadCompleted, true);
}

void FunctionLoadCompleted(LoadOperation<Function> loadOperation)
{
    var personOfFunction = loadOperation.Entities.First().Person;
    MessageBox.Show(personOfFunction.Name);
}

Some special notes to pay attention to:
  • Name the relation the same as the entity you are returning
    I find this a very strange implementation but if you name the navigation property different then for some strange reason RIA services won’t generate the relation properly
  • Make sure you don’t have any include attributes above the external reference in you metadata class
    When you do this RIA services will generate an objectset within the service context of that type.  This will generate errors when you’re trying to couple the entity type between the two service contexts.
That’s it, till next time!

woensdag 24 augustus 2011

Funny IT / Developer pictures

Last month I closed off with some funny programming quotes, this time I'm taking the visual road:


This one has got nothing to do with IT but it's funny as hell:


Have fun ;-)

woensdag 17 augustus 2011

Get the targetframework for an assembly

This is going to be a short post but I thought it might be useful for someone that encountered the same question.  So we basically have a number of options to get our targetframework from our assembly.  I’ll list three of my favored ones here:

ILDASM

This is a tool to inspect the generated IL of our code.  The cool thing about this tool is that we can also take a look at our manifest and see what the required framework is.
First launch the VS command prompt and type in ildasm.

From here the tool will launch and you’ll be able to select an assembly.


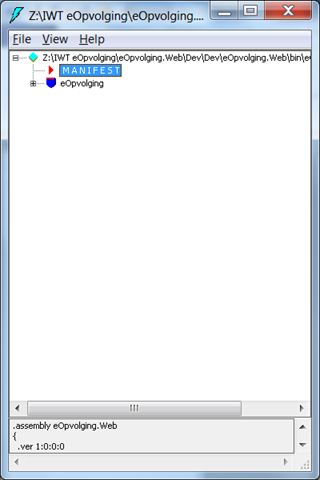
Once an assembly is selected we can view the manifest and retrieve the target framework.


DotPeek


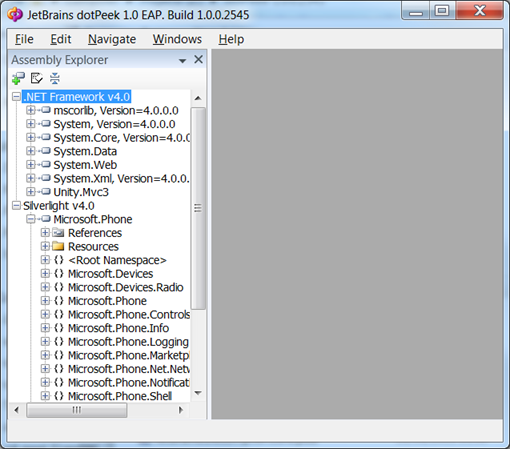
This is a no-brainer so I’m just going to provide you with a screenshot and a link to download this awesome tool.


From code

Last but certainly not least, we can load the assembly in code and get the TargetFrameworkAttribute from code.
var asm = Assembly.LoadFile(@"…");
var targetFrameworkAttributes = asm.GetCustomAttributes(typeof(System.Runtime.Versioning.TargetFrameworkAttribute), true);
if (targetFrameworkAttributes.Length > 0)
{
    var targetFrameworkAttribute = (TargetFrameworkAttribute)targetFrameworkAttributes.First();
    Console.WriteLine(targetFrameworkAttribute.FrameworkDisplayName);
}

I included a sample here.

Small note:  Make sure that you have your dependencies in the same folder or the assembly will fail to load.

That’s it, I hope it was of use to anyone :-)

dinsdag 16 augustus 2011

Compiler optimization with the shift operator


The other day I came across a peculiar operator in .NET called the shift operator.  I’ve seen it before in theory but I’ve never encountered a practical use for them.
For anyone who doesn’t know what the shift operator is, here is an explanation stolen from MSDN:

The right-shift operator (>>) shifts its first operand right by the number of bits specified by its second operand.
The left-shift operator (<<) shifts its first operand left by the number of bits specified by its second operand.

So simply put, when you have an integer that looks like this binary: 001000100 and you apply the right shift operator on it by 2 then you get 000010001.  For what could this be useful besides bit operations?
Well whenever you do a multiple or divide with a power-of-two number then you can use the shift operation to make this go faster.  Here is a small code sample to illustrate:

int nr;
int result;
var stopwatch = new Stopwatch();

nr = 5;

stopwatch.Start();
result = nr * 4;
stopwatch.Stop();

Console.WriteLine(result);
Console.WriteLine("{0} ms ellapsed", stopwatch.Elapsed);
stopwatch.Reset();

stopwatch.Start();
result = nr << 2;
stopwatch.Stop();

Console.WriteLine(result);
Console.WriteLine("{0} ms ellapsed", stopwatch.Elapsed);

So when we run this we get the following output:


As you can see the shift operator is almost an order of magnitude faster than the multiply operator yet they do exactly the same thing.  I saw allot of threads on stackoverflow (1, 2, ...)  telling people that you don’t have to worry about this kind of stuff because the compiler will optimize this for you, but a real life code sample demonstrates that this is not true.  Flipping the optimization flag doesn’t change the way the IL is generated nor does it change the way the JIT compiles the IL.  This is based on the results of this example.

Should you use the bit operator for code optimization?  I would recommend you not to do so unless you have to do very long and heavy calculations.  The reason for this is that it makes you code unreadable.  There are many programmers (even seasoned ones) out there that haven’t even heard of the bit shift operator.  When they’ll see your code they won’t be able to make head or tails out of it.  In most cases the advantage of optimizing your code in this way will be nullified by the decrease of readability of your code.   Of course when you’re doing bitwise operations you should use it when necessary.

Till next time

dinsdag 9 augustus 2011

Code Retreat Agile Minds

This Saturday I’ve had the pleasure of attending a code retreat hosted by Agile Minds.  The hosts were Erik Talboom and Adrian Bolboaca.  In case you don’t know what a code retreat is, here is a quick explanation:

A code retreat is an event where a bunch of geeks… euh fellow developers come together to spend their united time coding.  You get 45 minutes to code the assignment which is Conway’s Game of Life.  It might seem boring implementing the same problem over and over but I guarantee you that no implementation of this problem is ever the same. 

The goal of the event isn’t to finish the task at hand but to write the cleanest code possible.  For us developers this is hard to grasp because we have the urge to deliver. But delivering a final product is at the bottom of the priority list here.  

The assignment has to be coded in pair.  After every 45 minutes you have to switch pairs.  This makes it even more interesting because every time you start a new session, you are forced to reconsider your implementation with the ideas of the person you’ve paired up with.  It’s not allowed to pair up with someone twice so you’ll always have a different angle to tackle the problem.

At the start of the event Erik gave us a few recommendations.  He said that you’re not obligated to follow them but it’s strongly recommended that you do so.  One of the recommendations was that you write your code in a TDD fashion.  I’ve had some practical experience working test driven but I didn’t know you could take it that far.  One of the eye openers was TDD as if you meant it.

I’ve already done a code retreat once hosted by my employer, but this code retreat was different in several aspects.  The people in this code retreat were total strangers to me (except for one colleague of mine). I found it very interesting to pair up with people you’ve never seen before because you didn’t know what to expect from them.  It was also different in the way that this code retreat was language agnostic, meaning it didn’t matter what your preferred language was. There were people doing java, ruby, C#, python, etc.  I loved this aspect of the code retreat as it gave me the chance of trying out Ruby and Python, languages I’ve never done before.

It surprised me that there were a few people who had difficulty grasping the concepts of a code retreat.  They were stuck with the notion of delivering a final product and didn’t seem to be able to get their heads around the fact that a code retreat does not equal a coding dojo or programming contest :-). Though I think at the end of the day everyone had a fair idea of what to do.

It was really fun participating in this code retreat and I’m certainly joining the next one.  The learning experience was awesome.  Some of the stuff I’ve kept in the back of my head is:
  • Let TDD drive your design
  • Doing TDD will help you archive other solutions for your problem instead of the predefined one in your head
  • Everyone has a different angle for the same problem.  Combining insights can deliver promising results!
  • Having 2 keyboards is very useful when programming in pair
  • I’ve got to try out ruby
  • Python is one damn ugly language
Certainly take a look at the website of Agile Minds and join us next code retreat (recursion joke...)!

donderdag 4 augustus 2011

Html + jQuery vs Silverlight: part 3. Graphs

In the previous Html + jQuery vs Silverlight blogposts (1) (2) I discussed animations and how the two technologies compared to each other. Now we will see how the two measure up when displaying statistical data.

For the Silverlight side I will be using the Silverlight toolkit.  Granted that there are better solutions but most of these have a price tag assigned to them.  For the jQuery I will be using jqPlot.  I’m not sure whether this is the best solution but there are so many of these libraries out there that it is impossible to try them all out.  If you find that you have a better alternative than by all means post it.

The datasource I will be using for both examples is a fictional list of visitors for a blog. 
So let’s start building.  As usual I’ll be starting with Silverlight since this is the technology I have the most experience with. 

So at first we create a datasource for the graphs to be able to bind to:

Resources.Add("PageViews", new List<PageView>()
                {
                    new PageView(){Amount = 5000, Date = new DateTime(2011,1,1)},
                    new PageView(){Amount = 6000, Date = new DateTime(2011,2,1)},
                    new PageView(){Amount = 7000, Date = new DateTime(2011,3,1)},
                    new PageView(){Amount = 7500, Date = new DateTime(2011,4,1)},
                    new PageView(){Amount = 8100, Date = new DateTime(2011,5,1)}
                });

Now that this is done we create our graphs in the page and databind to our datasource:

<toolkit:Chart Grid.Row="0">
    <toolkit:Chart.Series>
        <toolkit:ColumnSeries
                    ItemsSource="{StaticResource PageViews}"
                    IndependentValueBinding="{Binding Date}"
                    DependentValueBinding="{Binding Amount}"/>
    </toolkit:Chart.Series>
</toolkit:Chart>
<toolkit:Chart Grid.Row="1">
    <toolkit:Chart.Series>
        <toolkit:PieSeries
                    ItemsSource="{StaticResource PageViews}"
                    IndependentValueBinding="{Binding Date}"
                    DependentValueBinding="{Binding Amount}"/>
    </toolkit:Chart.Series>
</toolkit:Chart>
<toolkit:Chart Grid.Row="2">
    <toolkit:Chart.Series>
        <toolkit:LineSeries
                    ItemsSource="{StaticResource PageViews}"
                    IndependentValueBinding="{Binding Date}"
                    DependentValueBinding="{Binding Amount}"/>
    </toolkit:Chart.Series>
</toolkit:Chart>

So that's it for Silverlight. How does jQuery compare towards this slick implementation?  Not that different!
Again we create our datasource:

var data = [['2011-01-01', 5000], ['2011-02-01', 6000], ['2011-03-01', 7000], ['2011-04-01', 7500], ['2011-05-01', 8100]];

Then we speak to our third party library to plot the graphs:

var line = $.jqplot('chart1', [[5000,6000,7000,7500,8100]], {
    cursor: { show: true },
    highlighter: { show: true },
    seriesDefaults: {
        renderer: $.jqplot.BarRenderer,
        rendererOptions: { fillToZero: true }
    },
    axesDefaults: {
        labelOptions: {
            fontSize: '13pt'
        }
    }
});


var pie = $.jqplot('chart2', [data], {
    series: [{
        renderer: $.jqplot.PieRenderer,
        rendererOptions: {
            sliceMargin: 3,
            showDataLabels: true,
            dataLabelNudge: 20
        }
    }],
    legend: {
        show: true
    }
});

var bar = $.jqplot('chart3', [data], {
    axesDefaults: {
        labelRenderer: $.jqplot.CanvasAxisLabelRenderer,
        labelOptions: {
            fontSize: '13pt'
        }
    },
    axes: {
        xaxis: {
            renderer: $.jqplot.CategoryAxisRenderer
        }
    }
});

The chart1, chart2 and chart3 identifiers are from 3 divs declared in the body:

<div id="chart1" style="height: 300px; width: 600px;">
</div>
<div id="chart2" style="height: 340px; width: 500px;">
</div>
<div id="chart3" style="height: 340px; width: 500px;">
</div>
So both implementations are pretty smooth, although it is pretty obvious that the XAML is way more expressive than the jQuery. Why would you favor jQuery over Silverlight then?  The usual Achilles heel of Silverlight is the plugin so I’m not bothering elaborating that even further.   

Rendering

This was a remark I made in the previous post but in this library I can’t say the Silverlight implementation is that much better than the jQuery implementation.  It does have some better rounded edges and the rendering has no difference in between browsers but besides that they both look nice.


Browser support:

It was fun to see that both examples worked in all browsers for both solution soI have no problem here.

Performance:

The drawing is pretty much identical on both technologies, yet if you opt for the Silverlight solution then you have the drawback of downloading the XAP.  The size of the XAP when fully stripped of all unnecessary assemblies is 360 KB, while the jquery solution with all scripts would account for 210 KB.  That’s not a big difference! The problem however is that the XAP still needs to be processed and loaded into the runtime.  For that reason the Silverlight solution takes around 3 times longer to load then the jQuery solution.

To conclude I would say that this round is favored for jQuery.  It’s much faster (to load) and there is a whole arsenal of free libraries at your disposal.  The rendering is pretty much the same and you don't need a plugin.

Till next time!